Today I have some exciting news which I can now share with you. Woo hoo – I have been invited to join the “Cuddly Buddly” design team. I am so thrilled. Why don’t you hop over to their web-site and have a browse. They have some really beautiful craft products, but you know me, I love stamps and they have all types including digital 😀 . Gorgeous stamps and products, I couldn’t be happier. Here is a little card I’ve made to celebrate and I think the card says it all for me –

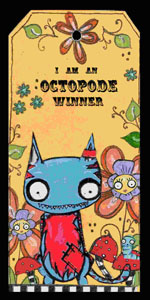
The sweet image is a Cuddly Buddly digital stamp by Kim “Emmy with basket”. Just look at that smile.
I hope you enjoy looking at all the products and there is a gallery where you can have fun and get inspiration. The blog will give you some terrific ideas too, so why not take a look. The monthly challenges start soon and we hope you will join in.
Bye for now,

Another quick post today. I have an Easter card which is quick and easy but so cute.

I’ve made these before HERE but this is the 2014 version. This is where I saw the wonderful original idea HERE.
This time I’ve folded the heart (wing) in half and added some foam dots between the layers. The eye is an embellishment I’ve had in my stash for a loooong time but a button would do just as well or even a “googly” eye.
I’ve added some gold glitter along the bottom to represent the straw nest. I tried raffia there but it just wasn’t quite right.
Why don’t you have some fun and try your hand at a “chook”. Good cluck luck!
Bye for now,
Just a quick post to show you my latest project.

I found some really cute “heart-shaped” egg cartons on the web and of course I HAD 🙂 to order some.

I made some rolled flowers free hand and used a variety of flower dies to cover the top of the carton.

I used a polystyrene heart shape on top of the carton to give some height to the flowers in the centre.

Apart from the flowers I added some pretty ribbon and lace and a “bunny” sentiment from Amuse stamps.

When I’ve added 3 chocolate eggs inside I think it will make a lovely gift at Easter.
Bye for now,
Hoppy Valentine’s Day. No, that’s not a mistake, things have been hopping around here 😆 .

I’ve been busy making little Valentine’s Day bunnies (I don’t want to see another bunny for quite some time 🙂 ).
Here is a close-up:

I found the idea for this on Pinterest and I just changed it a bit to make it a “love” bunny.

A very easy and cute Valentine favour. All you need to make your own is –
- a Chupa Chup (or other lolly pop)
- a polystyrene ball
- a white pipe cleaner
- 5 pom poms (don’t forget his tail)
- some ribbon
- 2 googly eyes
- a small heart
- 2 larger hearts layered together (for strength) for the feet
- stamp out or computer generated sentiment
- strong glue
Well I’d better get hopping and deliver them.
Bye for now,
It is quite a long time since I’ve needed to make a baby card and I didn’t know where to start this week when one was required. After some thought I decided to choose the colour first to match the little gift, then I chose the image. It is a High Hopes stamp which I have had for several years and still love.

Firstly I die cut an oval from a piece of apricot card, then embossed it. The clouds are die cut from white felt and then layered.

On a piece of white card which was slightly larger than the die cut oval I stamped the image and coloured it with Copics. Once that was done I attached it to the main card base to align with the die cut oval.

Next I attached the apricot card to the card base with foam tape to give it some dimension. I positioned the clouds to my liking and added a couple of hears. Finally the sentiment banner was added.
Thanks for dropping by today.
Bye for now,
Each year I try to recycle the Christmas cards we have received rather than just throwing them in the rubbish. This year I have decided to make them into bows.

To make my bows I have used a My Favorite Things (MFT) beautiful bow die-namics and Cuttlebug machine.

Take your assorted cards and remove backs. Place the dies on the card choosing the areas you like most. Run through the Cuttlebug (or similar).

Glue together.

The top left bow is made from the above die cut.

I made about 12 large bows and 3 small bows. Some of the cards were more suitable than others but they still all look great I think. The thinner the card stock the easier to work with.

I’m going to put them aside until next Christmas and use them on bags and parcels. You could use them with other embellishments such as curling ribbon, mistletoe, flowers etc. They could be used for other occasions as well.
Bye for now,
Let’s see if you can guess where we went for the quick break last weekend. Here are some clues –


Lunar (Chinese) New Year Amazing “glue” balloons had the kids enthralled


Some lovely old buildings


Who is this looking down her nose at me? and Who is this looking towards a bright future?
Of course you have guessed by now. I did try to make it a bit obscure adding the “China Town” photos first, but of course it is Sydney.Did you guess Queen Victoria and Captain Cook?
If I had put these photos first you would have guessed too easily 😉


The weather was beautiful and our mini site-seeing cruise and “hop-on hop-off” bus tour were lovely but the excuse reason we flew to Sydney was this –

On Sunday we caught a “ferry”out to Olympic Park (where the Olympics were held in 2000) to watch the last game of International T20 cricket “Australia vs England”.


England’s “huddle” before the game Lehmann (Australian coach) talking to the team before the game


Finch (“of course he is Victorian”) walking to the crease Plenty of entertainment when a “6” was hit.
A great night, the temperature was in the mid 20’s and a happy crowd with Australia finishing of the English tour with another convincing win. :]
Bye for now,
A good friend has recently had a procedure on her knee. It has been causing her pain for many years so it will be a good job done once the initial trauma is over.
Here is the card I put together for her using the cute digital image from Meljen’s Designs Digital Stamps called “Little Possum”. I just printed out a sentiment which I made on the computer.

I cut out an extra possum and butterfly to add to the card and raised them a little with foam dots. The possum, butterfly and tree were coloured with Copics. The clouds were formed by flicking a light blue Copic over the edge of “die cut” clouds which I kept moving down the page.

The flowers were made with rolled die cuts and a pearl placed in the centre. Some pink and green baker’s twine was wrapped around the panel and tied in a bow with a small faux crystal attached. Once I had done this I thought the card was finished, but no it just looked too bare so I added a broken line around the outer edge and then I was happy.

I’m not imagining my friend will be recuperating by hanging from a tree 😆 but I hope she will relax and keep her feet up. I know she is not one to sit still for too long (she is a hard worker) so this could be a challenge for her.

Wishing her a speedy recovery.
Bye for now,
Today I have created a card to submit to “Cuddly Buddly”, see their site HERE.

To apply you have to use one of the free templates which are offered on the Cuddly Buddly site.
My supplies (you will find all the supplies available at Cuddly Buddly):
- Kim’s Digi Templates – Crown Shaped Card (free template)
- Lilyboo Designs Digital Stamp – Princess & Kitten
- Paper from the Marianne Design Pretty Papers Bloc “Vintage Pastels”
- Bazzill cardstock 1 x mustard, 1 x cream
- Marianne Design Creatables Die – Frame Straight – LR0111
- Marianne Design Creatables Dies – English Roses LR0162 –
- Rosette Ribbon
- Copics
- Pearls from my stash
- Transparent fine glitter
- Toffee Crunch Momento Dew Drop ink
- Black ink
- Double sided tape
- Double sided foam pads or roll
Recipe:
- Download free crown template
- Download Princess & Kitten digital stamp
- Insert template and digital stamp into a new word document
- Resize the images to suit your needs. I wanted the crown card to fit into a 150 x 150 mm envelope.
- Print the crown onto mustard cardstock and again onto cream card.
- Print the crown onto patterned paper
- Cut out the mustard cardstock along the outer lines
- Cut out the cream cardstock along the inner lines
- Cut out the patterned paper along the red lines
- Lightly distress the edges with the Toffee Crunch Momento Dew Drop Ink
- Layer the mustard card, cream card and patterned paper using ds tape
- If you are going to add a sentiment this is when you should stamp it onto the patterned paper
- Resize the digital stamp Princess & Kitten to fit in the crown
- Print and cut out the image
- Colour with Copics and lightly add some glitter
- Die cut flower and leaves. Shape and assemble using a brad through the centre of the flower
- Attach a strip of rosette ribbon across the card
- Attach flower and leaves with glue
- Attach Princess and Kitten with ds foam
- Attach pearls to the circles on the top of the crown
A cute card for a cute little princess 🙂

A close up of the cute image which I coloured with Copics.

Hope you enjoyed today’s card. If you want to see other projects I’ve made using stamps from Cuddly Buddly just type “Cuddly Buddly” into the search box which is at the top right of the page.
Bye for now,
At last, after many years of lack of care and attention 😆 , this amazing plant has not only survived but flowered.

The Bird of Paradise (Strelitzia) is an exotic plant native to South Africa. The name comes from its flower which resembles a flying bird.

We didn’t really have much confidence in it surviving because of our cold winters. It has struggled on for a few years and finally it has flowered. I’m not sure if it is because of the heat wave we are experiencing at the moment (a week of temperatures hitting 4o°C / 104°F) or whether that is just a coincidence.

On a different matter. I’ve been trying to contact one of our crafting group via email but apparently her inbox is full (well that’s what the server tells me). Pam (Ballarat) if you read this would you contact me. Not urgent but I would like to hear from you.
Bye for now,
Warning Will Robinson – photo overload. (I apologize if you are too young to know where the “warning” phrase comes from).
Here are some photos from our Christmas holidays. . . Just skip to the end if you’re not interested, I have a quick and easy project to show you there.

Our grandchildren were very excited to see a “pirate” ship was visiting again this year. We arrived just as they were about to cast anchor.

Here it goes heading out to sea under motor (pirate ships don’t have motors do they?).

Then they put up some of the sails.

The carnival was in town again. Someone told us that it has been set up every Christmas for 50 years. It was as tacky as ever but kids always love it, first our children and now our grandchildren.

We went strawberry picking again and they were delicious but I think this little fellow thought he was expected to eat them all. We did eat quite a few but I made some jam with most of them. It was a microwave recipe and it was so simple but I’m told the ease didn’t detract from the flavour.

Kite flying was on the agenda too. The “squid” kite is always a winner. It doesn’t have any fancy moves but it goes up easily and stays there.

The fighting kite is a different matter. The only thing it fights is the operator.

Finally they flew together for a short time.
Now for crafty photos

I made some magnetic note pads for my “schoolie” friends.

I save any free advertising fridge magnets that I get and recycle them on these types of projects. Simply cut them into strips and glue the printed side to the back of the pad – easy and a good way to recycle them.

I hope they have been put up on the fridge for all those notes we need to make as we get older 😀
Bye for now,
I’m finally back to show you another gift I made before Christmas. It is an “after dinner mint” dispenser.

Please excuse the crooked stamping of the sentiment, just try to imagine that you stamped it correctly. 🙂
Supplies:
- 1 x sheet of cream card
- 1 x sheet of maroon card
- 2 x sheets of coordinating pattern paper
- 1 piece of ribbon
- double-sided tape
- glue
- trinket
- flower
Recipe:
- Cut one piece of cream card 26 cm x 16 cm
- Score the card along the long side at 6 cm, 12 cm, 18 cm and 24 cm
- Turn the card and score at 15 cm
- Cut out the 2 cm x 1 cm corner along the score lines
- On the second panel cut out a 6 cm x 2 cm rectangle
- See the photo below –

- Cut 1 piece of cream card 8.25 x 8.25 cm for the lid
- Score each side at 1 cm
- Diagonally cut each corner and snip one crease of each corner

- Cut 3 pieces of maroon card 5.5 x 14.5 cm and 1 piece 5.5 x 13.5 cm
- Cut 4 pieces of pattern paper 5 x 7 cm and 4 pieces of contrasting paper 5 x 7 cm

- Cut 1 piece maroon card 5.5 x 5.5 cm for the lid
- Cut 1 piece pattern paper 5 x 5 cm
- Cut 4 pieces coordinating paper 6 x .75cm

- Adhere maroon card and pattern papers to cream card and to the lid

- Using ds tape and glue (where necessary) form the body of the dispenser and lid
- Adhere the ribbon around the joining at the front (add sentiment panel to cover the join)
- Cut 2 pieces of cream card 6 x 7 cm and adhere to the inside and outside of the bottom of the dispenser
- Decorate as desired. (I attached a snowman trinket with cream thread and made 2 rosettes to add to the lid)

Add some “after dinner mints” or if you prefer some foil covered tea bags (you might have to check sizes as different brands might differ).
Once again here is the finished project.
Bye for now,

I hope everyone enjoyed their Christmas and New Year festivities. Well now it is back to blogging for me. I made quite a few projects over the weeks prior to the 25th which I just didn’t have time to show you.
Here is a little gift I made for a neighbour –

I filled the branch with Ferrero Rocher chocolates (yum). If I remember correctly it contained 6 chocolates.

The project is one I found on Martha Stewart’s site HERE called YULE LOG FAVOR BOX. If you don ‘t mind being covered in glitter and finding it on your desk for days and days you should enjoy this crafty project . 😆

Well I hope to be back soon with another project I made just before Christmas.
Happy New Year to all.
Bye for now,
Wishing all my blog friends a very MERRY CHRISTMAS. The sun is shining and last-minute preparations are underway. Only a few hours until Santa arrives, he should start to get ready for the rush don’t you think, but hey it’s the holidays.

Happy crafting over the holidays friends,
HO HO HO
Here is my next card. Very quick and easy. I found this card and I’ve just made 2 changes to make it my own.

The stamps are all from the one set “Winter Wonderland” from Mama Elephant”

I stamped the tree trunks with Iced Spruce Distress Ink and let it dry. Next I stamped the deer and sentiment with VersaMark ink and heat embossed with black embossing powder.

I added some sparkly snow flakes which are difficult to see in the photo and finally added a curve of matching card covered in glitter to represent a snowy hill.
Now for some family photos. We visited our eldest son’s family in Queensland last weekend to deliver their Christmas presents. Ohh it was beautiful weather with clear blue skies – lovely.

Sorry gd you moved just as the camera snapped.

Cool dudes!
These kookaburra landed on their deck and weren’t intimidated by us at all. They quite liked having their photos taken I think.


Bye for now,