I had kept our Christmas cards from last year with the hope that I could somehow use the pretty designs again for something else. Well yesterday I finally found an idea which was ridiculously easy and also very useful.
Method (although I don’t really think you need this :))
- Tear the front off the card
- Place tag die strategically over the picture to choose the prettiest section
- Run through Cuttlebug or other die cutting machine
- Punch a hole at the top

Just add some colour coordinated ribbons and voila and you have pretty tags ready to attach to Christmas gifts.
Here are a variety of my 2 dozen –


With some cards I was able to make 2 tags –

or even 3

Of course this would work just as well with any cards. I still have a few birthday cards which I can recycle so that might be fun this afternoon.
Bye for now,

We’ve had another blast of very cold weather over the last couple of days so it has been perfect weather to stay inside and CRAFT.
At the moment I am in the mood to make some little gifts ready for the Christmas market I attend. Today I’m showing you the first of the ideas turning over in my mind.

I have seen the decorated matchboxes (large) and tealights on several sites so it’s not an original idea but with my own packaging and embellishments from my stash they are quite cute. What do you think, will they sell at a Christmas market? Pricing is always a headache – what do you think?
I’ve just started working on my “mousetrap” for the challenge over at Out of a Hat Creations. I’m really looking forward to this one but have too many ideas whirling around.
That’s all for today.
Bye for now,

I have a very quick card to show you today. Over at Out of a Hat Creations the challenge this week is to use black, white and one other colour in your project.
The poppies are made with a Memory Box die, which I love and am sure to get a lot of use from. If I had more time I would have “tizzied” it up, but I need to get it into the challenge before it closes (only hours away). I also realise that it isn’t quite balanced, should have moved the sentiment up a little, sorry about that.
Can hardly wait to see what the next challenge is all about! A Mouse Trap ? EEeekkk – could be fun.
Sorry that I haven’t show you a photo of the residents of our new hen-house but they won’t show themselves outside yet. Shy little dears. As soon as they emerge I’ll show you.
Bye for now,
Taa Dah……….. Here is our new fully moveable “bespock” Chook Coop (or Chicken Coop for non-Australians) 😆

Personally designed and built by a df.

Self feeding and self watering (or at least self watering when it rains).
Free lodging – well almost free, just expect an egg a day. This will be a safe haven (let’s hope so anyway) to keep Mr Fox at bay.
Meet the residents tomorrow.
Bye for now,
A month ago I entered a “Some Odd Girl” Challenge and I was lucky enough to win a new stamp set. Click here to see my previous post. Today’s card features “Gifty Gwen” which is the set I received.

Isn’t she just the cutest. Her hair colour is “Blue Black” and Kristy has a tutorial here for Copics. I really love the effect. Her “frock” is paper pieced. The papers are from an Echo Park paper pad called “Dots & Stripes”.

Can you see in this photo that I haven’t decorated the inside of the card? While I was looking through my stash of Christmas cards a couple of days ago I realised that I’ve done it again – not decorated all the insides. I always promise myself to do the insides as I go, but I never keep my promise (rap over the knuckles for me). So I better get onto that job over the next week.
Think I’ll add this card to the Some Odd Girl gallery, so off I go and give it a go.
Bye for now,
The Olympics are over – which is just as well ‘cos I’m all “olympicsed” out. Congratulations to GB for a wonderful event.
Now back to crafting —– woo hoo.
Today’s card is for a clever young woman who made my dh’s birthday cake and cow cookies.

This is her Facebook page if you would like to see some of her work http://www.facebook.com/crumbsofyum.
Here is my first attempt at a “Free Standing Pop-Up Card”.

It folds down nice and flat to put in an envelope and post.

The cute Magnolia stamp is “Kitchen Tilda” – love her. The digi sentiment is a “beauty” from Tlc Creations from the Baker’s Secret set.

I’ve a lot of catching-up with house work to get on with – so I’d better take a deep breath and just do it.
Bye for now,
Are these serviettes or napkins?

Aren’t they pretty! I’m going to call them serviettes. They are made from oxygen bleached tissue. I looked on the web to find out what the difference between a napkin and a serviette might be. The only explanation which seemed logical to me was that a serviette is made of paper and a napkin is made of linen or cloth.
I bought them for a friend who has a fascination with pretty serviettes. It was her birthday last week but I haven’t posted until now because I have only just caught up with her to give her the gift. Hope you enjoy J.
Over at “Out of a Hat Creations” the challenge this week is All Parceled Up, so I think I will add my serviette holder.

I found the idea at this lovely site “mariannespapir.blogspot“. I measured the serviettes and then constructed the holder based on Marianne’s beautiful photo. Thank you also to Fiona at the Imagination Factory who helped me choose the papers and ribbons.

I was a bit worried that it might be unstable once I stood it up but it is (thankfully) very solid.

The Olympics are almost at an end so I’m looking forward to getting back into my craft room and creating again.
Bye for now,

My July ATC’s were due at the end of the month and AGAIN I had trouble finishing them on time. As I get older I am finding it more difficult to make a decision. Anyone else experiencing that? This decision shouldn’t bother me because ATC’s are supposed to be fun, but I just couldn’t decide what my “School” ATC’s should be.
First of all I thought I would make a 3.5″ x 2.5″ tiny backpack. I started, then realised that it would take me too much time. So I discarded that idea.

Next idea was simple and probably would have been ok, but I wasn’t quite happy so discarded that idea.

Finally I made these ATC’s –

Still not happy but unless I stopped changing my mind it would be the end of August before I had 9 cards made. Please don’t look too closely at my colouring of her hair. Some are ok but didn’t have time to start again when they were “dodgy”.
The cute little school girl is a digital stamp from Tiddlyinks “A+ Avenger”. She’s a real little smarty-pants, isn’t she!
I’m loving the Olympics but it is taking up a lot of my crafting time. I hope I’ll be back soon with a gift I have made.
Bye for now,

My nephew celebrated his 21st birthday recently and this is the card I made for him.

The denim paper is from Crate Paper. Denim is always good for male cards I think. The playing cards are from Kaisercraft Miss Match Collector. The poker chips are computer generated.
The digi stamp is from Tickled Pink Stamps “20’s Lad Luca”.

Here is a close up of Luca. He’s pretty cool isn’t he. I still really struggle with male cards but I think this stamp suits a young man’s style.
I think that I’ll probably be missing quite a bit over the next couple of “Olympic” weeks. Love to watch all the action on TV but for us here in Australia we have to watch late at night/very early morning. Being sleep deprived probably won’t help me create anything that I would want to share – in fact apart from that I’m in the card doldrums at the moment anyway. I do have a friend’s birthday in about 1 week so that might inspire me to make something which I can show you. I’ll try to post something for you to keep your interest.
Bye for now,
Edited to add the link to the clever lady who made this delicious cake – http://www.facebook.com/crumbsofyum. She also makes some cutie pie biscuits.

Cake – self-explanatory

Couldn’t possibly be THAT OLD.

A helping hand from cousin to see the cake.

It truly amazing how much tastier fruit is when you can eat it off a cocktail stick 🙂

Poor Grandpa hasn’t got much puff better give him some help.

Games we used to play “500’s” and still the old rivalry.

Yep – still the old rivalry.

CUTIE !!!

I’m ready to go on the train – where is everyone?

Thank goodness you made it in time cousin.

Ooooh

Happy families

Dad I need your sunnies – its glairy

Come on you big kids – time to get back on the train.

Nothing more relaxing than the sound and motion of a steam train.

That’s for sure.

What woke me up – it must be the train whistle.

End of a big day and we’re still smiling.

Thanks for a lovely day everyone.
Bye for now,
Over the next few days I will show you photos of our family celebrating dad/grandpa’s birthday. If you’re not interested look away now 😀 ‘cos there are lots of photos which I hope family and friends will enjoy.

How is it that under 5’s can manoeuvre around ipads while Grandma struggles?

And again 5-year-old learning about smart phones, while Grandma uses a “not so smart” phone.

At least the youngest still enjoys conventional toys.

Uncle and niece getting to know one another.

Good old wrapping paper and boxes are still good toys if you have imagination. Are they bob-sledding?

Next day we went to a Spanish restaurant where the adults had Tapas but the children had their own meals – fish and chips here.

Calamari – and who looks very happy with their choice?

The tongs were to share the tapas but little boys have different ideas – this is sure to end in tears.

Yep – tears.

Grandpa entertaining youngest while others eat.
That’s all today but keep watching for the next exciting 🙂 instalment including the cake.
Bye for now,

Here is the card I made for my dh’s special birthday.

Please don’t think that this card is my original idea. I have “cased” this beautiful card by Pam [click here]. When I saw the card I asked Pam if it would be alright to “case” her card and she very kindly said she would like to see my card. So here it is Pam, thanks for your inspirational blog.

My husband raises Angus cows, so perfect and likes to fish in the dam closest to the house, so perfect again.
The next photo shows the card from the side to show the easel style of the card with the extra steps.

I have used lots of dies but no patterned papers. Apart from the sentiment stamp the rest of Magnolia stamps. The sentiment is from PTI.

I will post some photos of dh’s birthday with our family as I get a chance over the next week. Probably won’t be posting any cards this week, but will get into the swing of blogging again in a week.
Bye for now,
Over at “Out of a Hat Creations” the challenge this week is to make a Twinchie to use by itself or added to a project. A Twinchie? I was asking “what the heck is a Twinchie”? Well of course 😉 it is a 2″ x 2″ Inchie.
I have made a very simple Twinchie and added it to a Corner Bookmark.

Here’s what I did (and I have made all the measurements in inches seeing as it is a “Twinchie” challenge):
What you will need –
- 1 piece of 2″ x 2″ card
- 1 piece of 1¾” x 1¾” designer paper
- 1 piece of 4″ x 4″ contrasting card
- 1 piece of 2¾” x 2¾” designer paper
- 8″ strip of ribbon
- edge punch
- foam tape and ds tape
- embellishments as desired (I used an art tile from Prima)

To make the twinche take the 2 x 2″ card and layer with 1¾ x 1¾” designer paper. I then traced around the tile and cut out a square so that the tile could sit down into the twinchie. I put foam tape on the back around the tile.

For the bookmark, take the 4 x 4″ card and mark the centre of 3 sides. Score from the 2 sides to the top then fold to the back. Next, punch a decorative edge along the bottom.
Cut the 2¾” x 2¾” designer paper in half diagonally. Attach 1 piece to the front of the bookmark and the other to the back. Add the ribbon around the centre of the bookmark (place the join in the ribbon in the centre front so the twinchie will cover the join).


Attach the Twinchie to the front and you’re ready to use it with your favourite book (not 12 Shades of Grey is it?) 😉

Hope you enjoyed this little project.
Bye for now,
Over at Catch The Bug Challenge Blog they are having a special week of challenges and fun starting this Saturday for Christmas in July. I really should be saving this post for then, as I see a challenge which would suit this card perfectly I think – but – I am an inpatient person and can’t wait until then and the challenge this week is “Anything goes” so I’ll post now.
Here is my “Anything Goes” easel card –

I love this digi stamp from Bugaboo simply called “wrapped up”. She could be used for any occasion but this time I have used her for my weekly Christmas card. The papers are from the Crate Paper pad called “Snow Day Collection”. The sentiment is from Create with TLC and just perfect for the image don’t you think? The smaller sentiment is from Penny Black.

The image is coloured with Copic Sketch Markers (you knew I was going to say that didn’t you) 😀 The card is cut with Spellbinders Dies.

Isn’t she saucy! He he he just love the look on her face. I hope you got a smile from the card.
Bye for now,

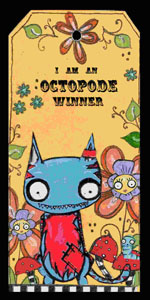
Today I have a tag to show you. The Octopode Factory Friday Challenge had a break but now they are back with the prompt of TAGS! so anything goes as long as it’s on a tag! Here is my tag –

The digi image is of course from The Octopode Factory. I printed it onto Kraft Card and cut it out. Then I coloured it with Prisma coloured pencils and blended it with Gamsol.

Next I sprayed the daffodil pieces with Pearl Glimmer Mist and left it to dry while I cut out the tag. I ran the yellow card through a sizzix embossing folder and then lightly ran a Dew Drop Brilliance “Moonlight White” ink pad over the surface and finally gave it a light spray of Glimmer Mist.

I cut out another tag shape in Kraft card and cut out the centre. I raised this piece with clear foam tape on top of the yellow card. I also raised the daffodil with clear foam tape.
The final step was to print out the Daffodil poem by William Wordsworth and add it to the back of the tag.
Bye for now,