Give-away #2.
Again today there will be 2 bundles of give-aways. Each give-away will be slightly different but of equal value.
These are once again open to everyone, world-wide. All you have to do to enter is to comment below using the words “Mariposa give-away yes please”. I would love you to subscribe to my blog but it isn’t necessary.
I HOPE THAT YOU WILL ENTER GIVE-AWAY #2. Go on – I would love for you to win.
GIVE-AWAYS – DAY # 2 will close on Saturday 29th Sept, 5 pm (Aust EST).
You can click on the photos to see them enlarged.
Here are today’s items –

DCWV papers from the Mariposa Matstack (about 1 dozen sheets).

There are 3 little clear top tins. The first has a variety of autumn colour flowers.

The second little tin has a variety of autumn toned buttons.

Finally the 3rd tin has some wide lace.
That is all for today but keep watching this week for more give-aways (not all will be international).
Bye for now,

During this week I have some ‘GIVE-AWAYS’.
I am a bit “stale” with my card making at the moment so it is your lucky day/s because I am once again purging some craft supplies. I have too much in my craft room but I hate giving it away because “I might just use it one day” haaa – I couldn’t possibly use it all in 2 life-times 😆
The 3D sheets I’m giving away were bought in multiples and I just don’t need them all – what was I thinking to buy more than one sheet at a time? Here is what I am giving away today –


You can click on the photos to see them enlarged.
I have a couple of sheets of most of these so there will be 2 bundles of give-aways. Each give-away will be slightly different but of equal value. I will throw in some papers as well.
Today’s give-aways are open to everyone, world-wide, because they will be easy (and cheap) to post. All you have to do to enter is to comment below using the words “3D give-away yes please”. I would love you to subscribe to my blog but it isn’t necessary. If I don’t have any responses I will give them to a local person I know who will put them to good use.
I HOPE THAT YOU WILL ENTER THE GIVE-AWAY. In the past I have been very embarrassed because only 1 or 2 people enter so I hope you will not be shy to comment. Go on – I would love for you to win.
GIVE-AWAYS – DAY #1 will close on Thursday 27th Sept, 5 pm (Aust EST).
That is all for today but keep watching this week for more give-aways (not all will be international).
Bye for now,

My fruit bowl was looking a bit sad and sorry yesterday. There were some bananas which were still okay inside but the skins had started to turn black. I couldn’t bring myself to eat them even though I knew they would be alright, so I looked for a banana cake recipe which didn’t include eggs. I found this recipe and cooked the cake last night –
Big Bird’s Banana Bread (from 1970’s Sesame St cookbook)
3 overripe bananas
3/4 cup honey
1/4 cup melted butter
1/2 teaspoon bicarb soda
1 1/2 cup plain flour
Preheat oven to 180C degrees. Melt 1/4 cup of butter. In a bowl, mash up the bananas, add the melted butter. Add the rest of the ingredients. Stir until everything is mixed together. Pour the mix into the oiled loaf tin. Bake for 1 hour.
So easy and tasty. I added a handful (culinary measurement :lol:) of chopped walnuts which was good. Adding a few chopped dates or raisins, etc and some spices might be good too. It is nice and moist and quite dense, will definitely make it again.

My dh took some to work today to share so I hope they liked it.
Bye for now,
It certainly has been a terrific year for lemon production. Even for people like us who usually can’t get one lemon on their tree this year home garden lemon trees have been prolific in their crop of lemons. I have frozen some juice in cubes (3 cubes = 1 lemon in my case), but we still have an abundance so what to do with them. Well dh loves lemon butter on his toast, so I thought I’d try to make some. Just to make it a bit more of a challenge I wanted to make it eggless (I’m allergic to eggs :(). There are recipes out there in blog land so I tried a recipe yesterday and it ended up like “clag” – out with that one. Today I tried a recipe with coconut milk. It looks okay but I’ll have to wait until the lemon butter connoisseur comes home to taste it and give me the verdict.

I tasted just a tiny tip of a teaspoon and it is very lemony – ohhh, so I decided I would call it “Pucker Lemon Butter” because that’s what it made me do. The title does remind me of Jamie Oliver a bit – not the cooking just the “pucker”. 😀
Talking food and egg allergies “Florrie” and “Dorrie” have presented us with these over the last 2 days.

Actually I think it might have been just Florrie or was it Dorrie, who provided both. One hen is much further through her molt than the other. I must remember to take a photo of the chooks for you.
I’ll let you know the outcome of the lemon butter taste test and the recipe if it is deemed any good.
Bye for now,
A few weeks ago I visited a little country town and in the newsagent I found these –

Little packets of tissues for your purse. Each tissue looks like either a AUD$20 or $50 note. I knew that I just had to have a couple to play with in my craft room.
I’ve made some cute little covers for them. Wouldn’t they look cute on your office desk?
 Firstly the $20 packet

Just some interesting info about the woman portrayed on the $20 note.
“Mary Reibey (1777–1855), featured on one side of the note, was transported to Australia in 1792 after a conviction for horse stealing. She built up substantial business interests including property, shipping and warehouses. In later life she became widely known for her charitable works and interest in church and education affairs.”
 Now the $50 packet

“Edith Cowan (1861–1932) is best remembered as the first female member of an Australian Parliament. She was elected to the Legislative Assembly of West Australia in 1921. Edith Cowan worked throughout her life on a wide range of educational, family, church and social issues.”
Ashamed as I am to admit it I had to look on the web for the facts about the notes. Well perhaps I’ve learnt something today.
That’s all for today so bye for now,
Almost the weekend again – who can believe it?!?
Over at OUT OF A HAT CREATIONS the challenge this week is Challenge 25 “Oriental Influences”. Plenty of scope with this challenge.
I decided to go with “Origami” . This description is from Wikipedia –
“Origami, from ori meaning “folding”, and kami meaning “paper”; (kami changes to gami due to rendaku) is the traditional Japanese art of paper folding, which started in the 17th century AD at the latest and was popularized outside of Japan in the mid-1900s. It has since then evolved into a modern art form. The goal of this art is to transform a flat sheet of paper into a finished sculpture through folding and sculpting techniques, and as such the use of cuts or glue are not considered to be origami.”

My version of an origami gift box – no cutting or gluing needed on the box itself.
Supplies needed –

A square of paper and bone folder. Any size square will work – just depends what size gift box you require.

Mark the centre of the square.

Place the patterned side of the paper under and fold each corner to the centre mark.
IMPORTANT – MAKE YOUR FOLDS CRISP AND CLEAN.

Next step is to fold each side to the centre.

Open up 2 opposite sides, leaving the other 2 sides folded in. Then pinch the sides of the top flap inward.

It might take a little bit of tweaking and practice to get the final sides folded in neatly. (It did for me but you might get it first time).
This is the top of the box finished. To make the bottom make the square slightly smaller (1 cm is good). Repeat the steps as per top.
Here is the embellishment I made for the top –

I used a scrap of some gorgeous embossed shiny red paper.

I cut 2 strips and used a border punch along each piece. Then I scored between each scallop and at the centre of each scallop. I glued the ends together and concertinaed the folds. Gently press the straight edge to the centre and glue the bottom to a small circle of paper.

I added another strip of the red paper over the top of the gift box and attached my embellishment.

I wanted to place something in the box – so thinking Asian – I added paper fortune cookies. Here are the “fortunes” I printed to place in the cookies.

One of my “fortune cookies”

Cut a circle of paper (any size). Fold in half without creasing. Hold at the top of the arc and with the other half gently press the outside tips to the middle (this might take a bit of jiggling to start). Place a glue dot or small piece of ds tape at the top of the fold to keep in place.

Don’t forget to place the “fortune” inside before you fold the cookie. Leave one end protruding.

I apologize if you are yawning by now 🙂 You’ve done well to make it to the end. This is the final photo of the cookies in the origami gift box.
Whew …….
Bye for now,

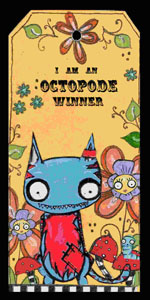
Congratulations on your birthday dbil. Hope you “score” lots of nice pressies. Here is the card I made for him.

You might be wondering why I chose this digi stamp for his card – yes in his younger days, only a few years ago :lol:, he used to be a football umpire. He doesn’t have a fat belly or wear glasses and wasn’t always a goal umpire, but a central umpire, and the uniform is wrong but you get the idea.
Here is a close-up of “Penalty Pat” from Dude Time Doodles.

The image was coloured with Copics – great image to colour. I added a picket fence (Martha Stewart punch) around the boundary and grass (The Cat’s Pyjamas die) to the oval.
This card is a top fold – you might be able to see it in this photo.

HAPPY BIRTHDAY!
Bye for now,

I may have said this before but I’m definitely a “blue sky” kinda person. It just make me feel so much happier. Here are some photos from our garden taken on my stroll in the sunshine, seems months since I’ve done that – oh it has been.


The blossom covered fruit trees are apricot and plum.
For years my dh has been planting windbreaks around our property and now they are bearing fruit flowers. Because some of the shrubs/trees are right down the back of the land, and I never venture there, he cut some for me – nice.


I thought I should feature the wattle which was in the bunch, being our national flower. Not sure if it is the correct species of wattle though but it is pretty anyway.
Enjoy your day.

This weekend at the PENNY BLACK blog the challenge is to make a “mini card”. I’ve made a set of 3 using the Penny Black Transparent set “Best Day Ever”. I have separated one stamp into 3 images (the hedgehogs are actually joined together with the string and running along with the jingle bells).

Here are close-ups of the individual cards.


The papers are from Kaisercraft “Mint Twist Collection”. The sentiments are also from this collection. I coloured the stamps with Copics. The top layer of the cards is raised on foam tape to add a bit of dimension.
I’m going to post these onto the PB gallery and then it is off to bed for me.

Bye for now,
Over at the SOME ODD GIRL Blog the challenge for September is a sketch. This one in fact –

Such a pretty sketch and I’ve a pretty digi image just screaming out to be used. Here is my Christmas card for the challenge –

Instead of having a scalloped edge I have snowflakes popping over the edge of the sentiment panel and instead of a rectangular panel on the right of the card I’ve attached a sparkly flourish. Can you see the similarity to the sketch? I hope so. Sometimes cards don’t exactly meet your expectations but this card does – I’m really pleased with the outcome.

Card recipe –
- Digi image – Some Odd Girl “Angel”
- Coloured with Copics
- Kraft card & white card – Bazzill
- Paper – My Mind’s Eye “All is Bright”
- Snowflakes – Martha Stewart punches
- Flourish – Magnolia Doohickeys
- Glitter
Another Christmas card done and dusted to add to my small stash.
Bye for now,
The challenge at Out of a Hat Creations this week is to use a Favourite Technique or Product. This was tricky for me because like most crafters I love so many styles, techniques and products. I thought about it for a few days then realised that the project I have made most often over the years is “Shoes”. I’d hate to think how many I’ve made – it would have to be near 1 hundred I’m guessing. Whether this exactly fits the brief of the challenge I’m not sure but for each shoe card I have used the Coppernob’s Elegant Slipper template – so that is my favourite product and the technique would be shaped cards. Another of my favourite products is the Coppernob’s Multiscore board which has grooves to make the boxes for the shoes.
Here are the 2 Christmas Shoe Cards I’ve made for the challenge –
In the boxes I made to fit them.

I’ve lots of photos from different angles, so if you are bored already you should look away now 😆


Phew that’s all of the photos and all for today.
Bye for now,

Yesterday one of my dgs celebrated his 2nd birthday. The party was so cute – a monkey theme. His mum decorated the house with jungle vines and palm trees with monkeys everywhere, so clever, even had jungle background music.
He is very keen on everything “Toy Story” at the moment and even tries to say “to infinity and beyond” which is adorable. So with that in mind here is the easel card I made for him –

I found a colouring page on the internet and coloured Buzz and added Dimensional Magic on his visor. The stamp is from a set from Verve which I have had for years, probably before the phrase became popular in Toy Story.
Today is Father’s Day in Australia and I have made a little parcel for my dh. I should have taken a photo of the contents so you could see why I have used the sentiment on the tag.

Included in the parcel are – Dark Chocolate with almonds, Nougat with nuts, Hawaiian Crunch with nuts, and mint with chocolate boiled lollies. Do you see the nut and sweet connection? I couldn’t find any “nut” dp but I thought this paper was fun.
I found some pictures on the web to give you an idea of what is in the parcel – sort of –


Yesterday was the first day of spring and the weather was lovely, blue skies and sun, bliss. Today looks like a repeat performance.
Hope you are enjoying your weekend. Bye for now,


The theme for August was SNOW. So here are my snowman ATC’s. Very hard to photograph because of the white on white on white. These are the 2nd last theme for our ATC group. September’s theme is COOKING and that is our finale.

Just a quick post and then off to the Imagination Factory to drop them in – just on the last day.
Bye for now,
Last Friday I went to the hairdressers. I had left it far too long between hair cuts and told the hairdresser to shave it all off :lol:. Of course she didn’t (thank goodness). While I was sitting there, trying not to look in the mirror (the mirrors in hairdressers are always far to good 😯 don’t you agree), I noticed some beautiful apricot roses reflected in the mirror from the little florist next door. The longer I sat there the more they called out to me – “Lorraine buy me and take me home”. It’s not at all like me to be spontaneous where these type of items are concerned but they were just beautiful.

The photo was taken today, 5 days after I bought them. I wish I had taken a photo earlier when the flowers weren’t so open, but they are still absolutely delighting me.

They were such a deep rich colour that apricot hardly described them. As they are opening further the colour is fading but still beautiful.
Each time I walk passed them I feel happy and have decided that I should spoil myself like this more often.
Bye for now,
Well I have had so much fun playing in the “altered mouse trap” challenge over at OUT OF A HAT CREATIONS but now my craft room looks like a bomb has hit it.
Wooden mouse traps are not so easy to come by now, mostly the supermarkets stock plastic versions. When I did find some I had to buy a packet of 2, so I’ve made 2 note-clips.
Here is my first hickory dickory silver mouse trap –

Did you notice the bit of a cruel twist on the trap – yes I just couldn’t resist adding a little Hello Kitty charm.
All the embellishments, except the mouse, were in my “extensive” stash of goodies. 🙂 I made the mouse from “Fimo” modelling clay and then covered it with glitter and added some pearl eyes and nose.
The next trap is my cheesy note clip –

The mouse stamp is a Penny Black wooden stamp – Penny Black are known for their mouse and hedgehog stamps and they are all cute. Once again every embellishment is from my stash.


Hope you enjoyed today’s project.
Bye for now,