I’m right back into stamping again now and I’m having some fun. Today’s little project is for the “Going Green” challenge at the TOFF Challenge Blog. The only stipulation for this challenge is to add a bit of green, and that is any green.
My project is a peg magnet for the refrigerator.

The digital image is from the Octopode Factory – “Flutterby”. I coloured the image with Copics and added some glitter on the wings and Dimensional Magic on the eyes.

I added some Washi Tape to the front of the peg and a magnet to the back.

In this photo you can see that I printed the image twice and cut out just the body of one image to raise above the wings. I attached the butterfly to some green card on which I had printed out “Flutter by Butterfly” and die cut some grass.

Now it is in use on my frig.
Talking about going green, how is this for sustainable transport? I spotted them on my travels a couple of days ago.

The donkey cart is waiting for its passengers to finish their grocery shopping before heading back home. This little town has quite a few families who choose alternative lifestyles.

This donkey’s name is Frodo which stuck in my mind but the other donkey’s name eludes me – might have been Daisy. This mode of travel really suits Maldon which is an historic gold mining town which has kept its history alive by retaining many of its original buildings. I would have taken photos of the shops but a storm rushed in just as I was taking photos of the donkeys. If you would like to read more about Maldon here is a link.
Bye for now,

Welcome back. Here is all you need to make your own Nappy/Diaper Baby – (see this post for more nappy/diaper babies)

Not many supplies and really you don’t need the eyes or heart pin but I have added them ‘cos they’re cute.
1. Roll the folded “new-born” nappy tightly, starting from the waist.

2. Secure with sticky tape (I have used the removable type so that the nappy isn’t torn when the tape is removed).

3. Place the rolled nappy on a baby face washer folded diagonally as shown.
4. Tightly wrap the face washer around the nappy. I folded the left side then tucked up the bottom and finally folded the right across and tucked the end in at the top of the back.

5. Roll or fold the “new-born” sock and place gently on your baby’s head 🙂

6. Secure the nappy with a little heart pin (optional – but I think it is cute).

7. Either draw on eyes or add some googly eyes.
That is all you have to do – easy peasy. Now make some more and put them in a cradle of some sort – I used a small cane basket.
I would love to see what you make. My babies are quite plain but with a bit more imagination I’m sure you could easily come up with some very cute or quirky babies. I’ve seen some with tiny dummies in their mouths – awwww.
Bye for now,
I’ve made a card – hooray!!! It’s been quite a while but at last I have a card to show you.

I’m entering it in Challenge 51 at Out of a Hat Creations – Easter Bonnet.

The digital stamp is “Victoria” by Sugar Nellie from Funky Kits. I enjoyed colouring her with Copics, haven’t coloured for a while either.

You might just be able to tell from the photo that I printed the image twice and then cut out just the hat from the second image. I coloured both parts and then popped the 2nd hat up on foam dots to give it some dimension – I was quite pleased with the result.
Well I’ll be back tomorrow with a short tutorial for the Nappy Babies.
Bye for now,
I’m thinking that many of you will have seen these diaper babies (I prefer Nappy Babies) before, but they are new to me and I love them. I’ve made a set in blue and the second in girlie colours.

Each baby is made from a “newborn” nappy, a “newborn sock” and a baby face-washer. Cutie patootie hey!
Here are my first set of quads –

I have placed 8 disposable nappies under them, making a total of 12 nappies. I’ve covered the nappies with 2 more face-washers, making a total of 6. The little beanies are made from 2 sets of tiny socks.
Here is the second set of quads –

Ssshh – some are asleep.
I think that when I give them as gifts I will add a couple of other things, perhaps baby oil or singlets – there is a little space near their tootsies.

Hope you enjoyed today’s post. I haven’t made a card for quite a while so I had better put the “thinking hat” on and show you some cards or people will stop watching my blog.
Bye for now,
It was Labour Day holiday here in Victoria last weekend. Dh and I made the most of the long weekend and flew up to see our son and his family in Queensland. They “shouted” dh and I to a tour of Q1, the tallest building in Surfers Paradise on the Gold Coast. What great views from the 77th floor.

North towards Brisbane –

South towards NSW –

and all in between –


and finally we spotted some “little nippers” competing on the beach. (little nippers are children who would like to be life savers when they grow up and enjoy the sports that are involved.

closer

My son tells me that they have had 2 months of rain and while we were there it was not much better. It was so nice to see green grass because at home it has been sooo HOT and dry. If we could share some of their rain we would all be happy.
Well we’re home again now and today was below 30ºC which is the first time in 2 weeks so it was lovely.
Talk to you again soon,
Out of a Hat Creations has/had a great challenge this week “Hanging About”. I only have minutes until the challenge closes, so without any further ado here is my “Hanging About” project.

Close-up of the owl

Close-up of the drop

Okay that’s all – I’m off to link up my project. ps – since I took the photo I have added some bling to his eyes.
Bye for now,
A few weeks ago I showed you this card in which I had added some store-bought tea bags. In the meantime I spotted a couple of tuts for making your own tea bags, so of course I had to try them.

These are my versions to match the card.
The tea bags are very easy to make and my dh was my tester and he thought the taste was excellent. You know what they say about store-bought tea bags “teabag tea is taken from the sweepings off of the factory floors. This is then swept up and processed into tea for teabags”. That couldn’t possibly be right but it is nice to make your own.

All you need – “coffee filters” and “loose tea leaves” from the supermarket.

Cut the filter into a rectangle, leaving the sealed section at the bottom. Sew up 3 sides, leaving the top open. Fill with a teaspoon of tea leaves. Place the thread you are going to use to attach the tag across the open end, fold the top corners into the centre and fold down the top. Finally sew across the top.

Then make some tags. Mine are quite plain but you could go to town with these – flowers, butterflies, hearts, etc.

Hope you enjoyed this little bit of fun.
Bye for now,
The little note books I made on Tuesday were made in minutes. The longest part of the project was selecting some magazine pages.

Most people have old magazines lying around so this is a good way of recycling at least a little part of them. For me the best size to make the little notebooks is 5 cm x 10 cm. That size was perfect to staple. I tried other sizes as well.

I’m going to put a couple in the car, 1 in my purse, one near the telephone, etc. They will be handy to jot down numbers, notes, shopping … and on and on.
I used some Washi tape on the spine of a couple just to add effect.

All you have to do to make these is
- Tear out pretty pages from magazines
- Cut them into 10 x 10 cm squares (4″ x 4″ approx) to be used as the covers
- Score and crease down the centre
- Collect together some old half used exercise books or pads
- Cut 9.75 x 9.75 cm pads of paper – just slightly smaller than the cover (you can use as many pages as you like)
- Staple the pads to the inside of the cover
- Fold in half and crease firmly (I put mine under a heavy weight for a few hours)
Next I found a few old birthday cards to recycle.

These were even easier because they already have the centre fold. Took even less time. I’ll put these in dh’s car.

Of course is you want to make bigger books and you don’t have a stapler with a long enough arm you can always sew the books, either by hand or machine (this might even make it easier to tear out a page). Mine aren’t very imaginative but they will be very handy. If you make some I’d love to see them – see what you can come up with.
Bye for now,
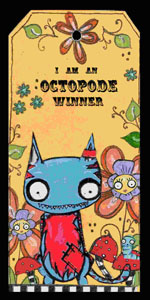
The challenge at Out of a Hat Creations this week is to “Alter a Matchbox”. There is another challenge which I can enter with the same project and I haven’t entered this challenge for a long time – The Octopode Factory “toff challenge – HEARTS”.
I searched on the web to see what crafty things could be achieved on a small item such as a matchbox – plenty of ideas especially with mixed-media. I’ve never learnt anything about that style of craft. Anyone know some good tutorials or where I can get some good info on mixed-media? I’m wanting some different craft ideas at the moment.
Here is what I came up with for my matchbox using the Octopode Factory digital image “Care Bear” –

It seems that you put something in the tiny box. I wanted a little bear but where do you find those? So I settled for some honey bears – well I was looking for honey bears but could only find these gummy bears. Do they still make Honey Bears?


Bye for now,
While we were on Bruny Island, Tasmania, we visited several small businesses and they were wonderful. One shop we visited was the Bruny Island Providore and they sold all sorts of sweetness. I bought a small box of Persian Fudge. It wasn’t so much what was in the box but the box itself which interested me.

I loved the shape of the box so I decided to reproduce my own version. The first thing I HAD to do was empty the box, not a problem 😆

The second thing I did was disassemble the packet and trace around the shape and take measurements.
In case you are interested in making a Trapezium box I have drawn up a template (not to scale). edited – (I had missed a measurement on the original template and I have replaced it with this copy of the template with the extra measurement)

Here is my version –

and various steps along the way to the final product


I couldn’t decide which way to turn it, have the smaller rectangle at the top or bottom.


I made a rosette to put on the top, added some leave and three buttons – finished. Then I decided to make a little card to go along with the box.

Here is my final set.

It is amazing what information your brain stores. When I was thinking about a title for today’s post “Trapezium” sprang to mind but I really didn’t know why. I looked it up on the web (my spelling was a bit off) and I couldn’t believe that what I had made was a Trapezium. That must have been stored in a “cobwebby” corner of my brain from when I was at school and girls had to do a term of “Graphic Communications” (ugh) and boys had to do a term of “Home Economics”. The days of feminism!!!!
That’s all for now,
I always love receiving parcels in the mail, it feels like Christmas or a birthday even though I have paid for them myself online. Through experience I know that it takes approximately 7 days for a parcel to arrive from the USA and 10 days from the UK so I usually know what the parcel will be when I go to pick it up from the PO. A week or so ago I received a card in the letterbox advising me that there was a parcel waiting for me. I hadn’t ordered anything so I thought it must be something for dh. When I picked it up the return address said “Clear and Simple Stamps”. I was SURE I hadn’t ordered anything from them. This is what was inside –

A wonderful clear stamp set with a card from Reenee & Nicki thanking me for purchasing from them last year. The name of the set is “Limited Edition: JOY”. Well I was JOYFUL to say the least.

Now how is that for extra good PR?
I saw a beautiful card using one of the sentiments from this set on Facebook and followed the link to here.
Noticing that I am almost to 30,000 views on my blog and wanting to share my JOY I am offering some blog candy. Here are a Clear and Simple Stamp Set and matching Dies (new – never used) –


If you would like a chance to own these sets all you have to do is leave a comment on this post and guess which date I will reach 30,000 views/hits. I’m sorry to limit this but AUSTRALIAN entrants only (just because of the postage costs). – The person closest to the correct date will win, if there are 2 or more with the correct date there will be a random draw. * The give-away closes Monday 25th Feb ’13
Here is some inspiration using these sets –
- http://www.clearandsimplestampsonline.com/2012/07/sw-70712/
- http://www.clearandsimplestampsonline.com/2012/07/c4-3/
Hoping a few people will enter this draw – I’d love to hear from you.
Bye for now,
I’m sure you’ve been told at one time or another “the dishes won’t do themselves, there’s no Dishes Fairy”. Well apparently that’s not quite true – Whiff of Joy Stamps have this gorgeous “Melinda helping Angel” and guess what – she’s drying the dishes.
The challenge at Whiff of Joy is “Anything Goes”. That’s a very broad theme so here is my entry.

I have a friend in mind for this project. I’m going to send her this “Dishes Fairy” so she can forget about the dishes, put her feet up and have a cup of tea.

I’ve made the card into a folder and have included some tea bags for her.

The papers I have used are from Graphics45 “Once Upon a Springtime”. I love these papers and have kept them because I didn’t want to cut into them, but today I just put my head down and cut. They work really well with this image I think.


By-the-way, did you notice that this is NOT an EASEL card – woo hoo – perhaps this is the beginning of different fold cards. Let’s just wait and see.
Bye for now,
It was one of my dgs’s birthday on Valentine’s day. It sounds as though he received some GREAT presents so he is a very happy boy.
He has just started playing soccer, so I thought he might like this card.

The photo we have of him getting ready shows his uniform as red and white so this is as close as I could get.

The card closed ready for posting.

The inside of the card.

Hope he had a “ball” on his birthday! 🙄 (had to be said)

Bye for now,
All day the wind had been very blustery but I hadn’t taken any notice because I was at my dh’s office in Ballarat and then I came home and headed straight into my craft room. I was doing some “research” (looking at pretty blogs) 🙄 on the computer when at about 3:30 I turned my head to look out of the kitchen window. Oh goodness a fire on Mt Warrenheip – not very far from here. The wind was whipping the fire up over the hill.
I grabbed my camera and went to take a photo. Just as I was focusing the camera lightning flashed over the mountain. Now wouldn’t that have been a shot.

It seemed to be contained when all of a sudden numerous spot fires broke out further up the hill, embers flamed by the wind I guess.

You can just see one of the spot fires in this photo I think.

When I looked to the right I could see a storm front coming from the west and hear thunder. In this photo the black clouds on the left are smoke from the fire and on the right are black stormy clouds.

Then I turned 180º and on the left were more stormy clouds and ahead smoke from another fire in the distance.
When dh arrived home at 5:30 he was amazed to see that we had only had a few drops of rain, not even enough to register in the rain gauge. He said that he thought the fire would be out because in Ballarat the roads were flooded. They had received 28 millimetres in less than ½ hour. We would have loved to see some of that here, we are only 10 kms away.
So what an afternoon!
Bye for now. I’ll see you tomorrow when I post my gs’s birthday card.
Today’s card is for the High Hopes Stamps: Challenge 163 – Two by Two. I’ve used the High Hopes stamp “Peeking Kitty” which has two characters in it – the cute kitty and his tweety bird friend.

Are you saying “Oh no, another easel card”. I’m sorry if you are but I’m lovin’ them at the moment, in fact I have another one for tomorrow. I’ll have to try to wean myself off them 😥
Here is the kitty and the bird which I have sparkled up.

The card closed ready for posting.

Inside of the card.

At the moment I can’t find the link to attach my card to the challenge but as soon as I do I’ll post to the High Hopes Stamps site for Challenge 163.

Tomorrow I will be able to show you one of my gs’s birthday card. It is his birthday today (yes what a lucky boy to have his birthday on Valentine’s Day) so he should have it by then.
Bye for now,