I can show you this card now because the “birthday girl” has received her card.

I used a die from Marianne Design to die cut the fan.

The digital images are so sweet and I thought they went well with the fan. I bought them through Etsy.

This stand was die cut with a die from Joy crafts! I cut 2 and glued them together to make it a little bit stronger.

Finally here is the fan card standing up on its stand.
There are so many ways you could decorate the fan by adding lace, rhinestones, feathers, etc. etc. I might use this for a craft day in the future.
Bye for now,

Here in my part of Australia it seldom snows, even though we do have cold weather it is rarely cold enough to snow. We all turn into little kids again when it does snow even if only briefly. 🙂 This photo was taken at our house about 4 days ago. So pretty

The following 3 days we have woken to very heavy frosts but when the frost melts we have had beautiful blue skies. I don’t care if it is cold as long as there are blue skies. It makes me hopeful that winter is on its way out.
The second seldom seen thing is this spectacular cake.

We had a lovely engagement party to attend yesterday and this is the amazing cake. The cake and stunning icing peonies and flowers were made by the VERY TALENTED sister of the engaged couple. How many hours do you think it would have taken her? I couldn’t even hazard a guess.

Look at the beautiful ombre effect in the peonies. Spectacular. Can you tell I was very impressed? 😀 The engaged couple looked just as beautiful, handsome and happy too. It was a lovely day.
Bye for now,
A friend has had a very difficult time lately and I wanted to make a card for her to let her know we are thinking of her. I have some new “Gelatos”. I’ve had them for a while but hadn’t a chance to try them out so this was the perfect opportunity.

There are 4 different leaf shapes in the die cut set from Cheery Lyn “SM leaves 2”. I cut 3 or 4 leaves from each of the leaf shapes. I used a smooth white card.

I used yellow, orange, red and olive-green “gelatos” on each leaf blending them with my fingers. Once I was happy with the blending I used a foam pad and stylus to give the leaves some dimension.

I glued the leaves to the front panel of the card and added some gorgeous lace and punched details.
This card’s inspiration is from KittieKraft. Thank you Kittie.
Bye for now,
Over the last week or so I’ve made a couple of cards which had quite large flowers and embellishments on them. If I had posted them in a normal envelope the flowers would have been totally squashed – not what you want when you have spent a lot of time to make them look pretty. I wanted to make a box which could still look and work as an envelope. Here is what I came up with –


You can make these to suit any size card. The central rectangle is made to fit the card with a cm to spare all round. Width ways you have 2 cm, 2 cm, the centre measurement, 2 cm, 2 cm. Length ways from the top you have approximately 1⁄3 of the centre measurement, 2 cm, the centre measurement, 2 cm, approximately ¾ of the centre measurement plus 1 or 2 cm for overlap. Round the corners.

Decorate the outside of the box with matching papers.
I made a “belly band” to keep this box closed and it is easily slipped off to get the card.

This envelope box has magnets to keep it closed which are hidden under the flower.

The card slips neatly into the box and looks rather sweet as it is removed.

Once again the card slips in neatly even though the card is an odd shape.
I think they look as pretty as they are useful.
Bye for now,


A while back I showed you a pocket card I made for a friend’s neighbour who will celebrate turning 90. Today I have a second card for my friend so she has a choice. Once again the requirements were”a different fold and roses”. This card is a “trifold” card and I really enjoyed making it but it sat in front of me for days while I was procrastinating, finally this is what I came up with –

The papers and embellishments I used are an old set from Bella! “Ever After”, such a pretty set which I have been hoarding.

The flowers are from several suppliers and the leaves I die-cut from Cheery Lynn Designs “Small Leaves 2”. The colour of the leaves are actually much lighter than they show in the photos.

Here is how the card opens showing the tag inside.

The tag lifts out so you can write on it.

Here is my attempt at “arty” photography 😀
Soon I will show the boxes I have made for both cards.
Bye for now,
I have started to go through our photos from Japan and thought I should share a few more with you.

The Senso-ji Buddhist Temple in Tokyo is one of the most famed temples in all of Japan.

These lovely girls in traditional clothes were happy for me to take their photos.
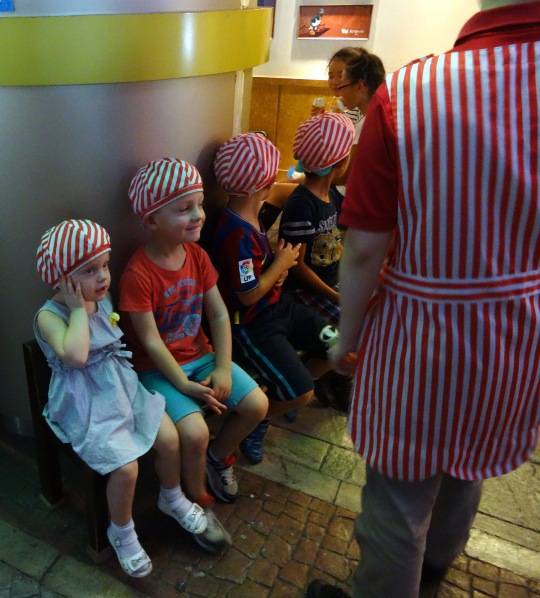
We visited “KidZania” in Tokyo. It has more than 90 different activities for Kids to choose from. Here our grandchildren chose to learn about making ice cream. They had to wear hair nets and caps and aprons. They learned about washing their hands and hygiene etc. After performing this they were able to pipe a soft serve ice cream for themselves. What fun! Some of the other careers they could try were beautician, inventor, fireman, policeman, bride & groom, engineer, construction worker, fashion designer etc, etc, etc.

Rickshaws for the tourists.

Ninna-ji Temple’s 5 storied pagoda (above) and below a view through one of the circular windows in the former residence of the head priest. The zen was evident in this place.


We went to the Tokyo National Museum and that was one of my high lights. It made you realize just how old their culture is. This is a photo Shakōki-dogū (1000–400 BCE) (BC – wow!!!), “goggle-eyed type” figurine. A Japanese woman was looking at this figurine when I approached and she was very excited to tell me that the figurine had “goggles” and that it was very mysterious because this was well before glasses were invented and that made it was from the heavens. I think she was trying to tell me he was an alien. Her husband just shook his head and walked off, but she was very excited to tell me (perhaps something was lost in translation) 🙂

Sagano Bamboo Grove – wonderful. It is in a UNESCO World Heritage area. You really can’t tell the scale from this photo. The bamboo was at a guess 10 metres (about 34 feet) high and the diameter was about 180 mms (perhaps 8 inches) at the base.

Japanese seem to love their ice cream and there are lots of shops specializing in just that. We sat in this shop and enjoyed very refreshing ice cream. Unusually most of the ice creams sit on top of corn flakes. Surprisingly it seems to go well together. The staff in this store were dress traditionally and were happy to pose for a photo. Our little grand daughter’s red hair made her very popular and everyone wanted to be her friend. 😆
We had a wonderful time and recommend Japan as a friendly and safe place to visit.
Bye for now,
A dear friend has asked me to make a card for a neighbour who will be turning 90 (well done I say). She would like the card to have roses on it and be a special fold. My mojo is in very short supply at the moment and has been for quite some time 😦 . Then I remembered a card I admired sometime ago on Pinterest HERE and I’m afraid I CASED it very closely (almost exactly, even down to the colour). It is by the “oh so talented” Kittie Caracciolo. My many thanks to Kittie for providing such beautiful cards for us ordinary crafters to look at.

Kittie made her own flowers but I used store-bought flowers (I think they might be Kaiser). I did punch the leaves and rim of the pot.

The card is a pocket card as you can see below.

The 3 sentiments are from Penny Black a clear set “Gratitude”.

I’m in the process of making another card and will show you as soon as I finish.
Bye for now,
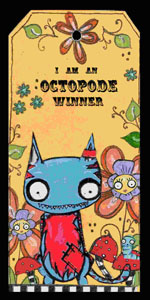
I’m back today to let you know that this month’s challenge over at Cuddly Buddly is open. The theme is “BUTTERFLIES”. Hope you enjoy the projects the Design Team have put together.
This is my Butterfly project –

If you would like to see more photos and the tutorial why not click on the link HERE and take a look at the Cuddly Buddly Blog.
Bye for now,
I’m back from a wonderful, interesting, educational, fun …….. holiday. I’m still organizing myself so I just have a couple of photos for you today, but I will definitely be showing you more soon.

The Golden Pavilion (Kinkakuji) is a Zen Temple in Kyoto – the top floors are covered in gold leaf. Such a beautiful area.

How have they achieved this?

The plastic replicas of food in the shop windows is remarkable and makes it much easier to choose (or not choose in this case).
I’m off to our crafty day now (luckily I don’t have to prepare anything this time).
Bye for now,
I had shown you at the end of 2012 some versions of a Tic Tac cover which I had made to look like miniature back packs. Perfect little gifts for a teacher gift or little gifts for school friends or anyone in fact. At the time I promised a tutorial and immediately forgot to follow-up on that. Eventually someone gave me nudge to remind me of the tutorial, so here it is today.
Supplies:
- Double sided patterned paper (not too thin)
- Double sided tape (strong)
- A brad or enamel dot
- A set of small magnets
Recipe:
- Cut 4 pieces of patterned paper of the following sizes –
– 15.5 x 10.5 cm (6½” x 4¼”) – 8.5 x 4.5 cm (3½” x 1¾”) – 9.5 x 1 cm (2 strips) (3¾” x ½”)

- Take the largest piece and score along the longest side at – 1.5 cm, 4 cm, 8.5 cm and 11 cm (½”, 1½”, 3½” and 4½” ).
- Turn the card and score at 2 cm (¾”) for the bottom of the pack.
- Cut off the left square at the bottom of the pack and trim the sides as in the photo above
- Fold this piece to form the main piece of the back pack
- Using double-sided tape adhere the side and bottom
- Take the second largest piece and score along the long side at – 3 cm and 5.5 cm (1¼” and 2¼”).
- Punch the corners
- Score the smallest strips of paper and score at 2 cm (½”).
- Attach the strips of paper to the inside of the back using the score line as an indicator of how far down the strip should be placed.
- Attach the other ends of the strips to the outside of the back.


- Using double-sided tape attach the last piece of patterned paper to the inside of the back pack aligning the fold with the top of the box shape.
- Attach a magnet to the inside of the flap about 1 cm from the edge in the centre.
- Attach the other magnet to the inside of the box to correspond with the other.

Here is another example

Finished Tic Tac Back Packs.

I haven’t added a sentiment ‘cos I’m not sure who I am giving them to as yet but you should add a sentiment (see this post).
Well I hope that helps Christy, once you know the measurements and design they are quick and easy. Hope you enjoy. I have added imperial measurements but I’m not 100% certain they are accurate, so try on a scrap of paper first.
Bye for now,
Over at the Cuddly Buddly Blog the challenge for this month is “Beads &/or Charms”. If you would like to hop over and check it out HERE is the link. My “Friend Tag” and Friendship Bracelets are listed but the instructions aren’t available just yet. Throughout the month more tutorials will go live on the blog so pop back often to see what’s new.
Here is a photo of my project –

Hope my friends will enter the challenge. It would be a thrill for me if one of my blogging friends won.
Well that is all for today but I will be back soon with a tutorial for the TIC TAC Backpack which I promised to post and then immediately forgot about. I will post it in the next day or so – promise 🙂
Bye for now,
Happiness is chocolate and a good book. It might only be the sentiment I used on this bookmark but I think there might be quite a few of us who would agree with the quote. 😆

Here is the “chocolate block cover and bookmark” I made for the Challenge at Cuddly Buddly last month. If you would like the instructions and supplies feel free to hop over to my tutorial at Cuddly Buddly. The book mark is attached to the cover but it can easily be taken off to use with your favourite “read”.

The new challenge starts VERY soon so keep an eye out at Cuddly Buddly.
Bye for now,
You may have noticed that I haven’t been posting many cards lately, well I had lost inspiration. Today was our crafty get-together day with friends and I have come home inspired. It is so motivating to be with a group of women who love paper craft as much as I do. Such a nice group, helpful and willing to show new ideas and share their talents. We are all at different stages but it doesn’t make a difference because every one helps each other. Thanks Julie C for showing us how to make a beautiful sun burst card. I think this is such a versatile card which we will all be able to use for a variety of occasions. Enough gushing 😀 on with the tags.
When I came home from card making this afternoon my husband told me he had seen our first Robin Redbreast for the season. Beautiful. So with my enthusiasm ignited and the thought of Robins back for winter I thought it was the perfect time to make 2 tags.

I found a vintage image of Robins in my stash which was lucky.

I added a die cut fence, some red roses and die cut grass.

This photo shows how I raised the fence in the centre to fit the roses behind.
Both tags were quick and easy but the second was particularly quick.

I die cut the frame and centre to the frame then added 2 ready cut images from my stash.

I raised the bird with foam dots. The final steps were to add some soft yellow card behind the tag and add ribbon.
So 2 tags in 1 evening – I’m pretty happy.
Bye for now, but I’m sure I’ll be back soon.
It’s been weeks since I last posted, life has been a bit busy with one thing and another and I still don’t have a card to show you. I do have some family photos from our “Mermaid/Sea” party last Sunday.


Watermelon shark.


Pearls (jellybeans) in their shells (macaroons) Fruit Jelly crabs


Ahoy matey! Some fun inside sand “98% sand 2% magic” they say.


Castle makers. Jelly and mandarin yachts.


Salmon & mayo fish sandwiches Croissant crabs with cream cheese & strawberries.


Buckets ready for fish and chips. Sea treasure – doubloons, shells and octopi.


Clothes peg snapping fish.

Delicious Paella. Recipe by Julie Goodwin (1st Master Chef winner) HERE.
We had a fun day.
Bye for now,