A challenge card today. The challenge is over at Penny Black Saturday Challenge and is “CASE-IT”. I really like the card which has been chosen to CASE and I’ve decided to follow the design very closely. Of course the papers and other elements are different but I have kept to the design because the stamp I wanted to use suited it so well.

This “City Chic” girl is getting on in years now – but who can tell – I think she is still as cute as ever 🙂 This stamp is thanks to my sister. So I hope I’ve done her justice.
The papers are from October Afternoon “Sasparilla” and Teresa Collins “Spring Fling”. I’m pleased with the combination. Perhaps a bit 70’s or 80’s? Gingham, Denim and Paisley!

The girl is a good friend – look she has an extra bag so that her bf can go shopping with her. I stamped out 2 images and cut out an extra bag to hang off her hand. Didn’t want them to have exactly the same style so coloured them differently. 😆
Hope you enjoyed today’s card.
Bye for now,

I have been asked to make a special card for someone whose dear cat/companion has passed away. I find it difficult to make sympathy cards. Looking through my stamps I realised that there were several dog images but fewer cats. After searching the web I found a couple of digital stamps which I thought might be suitable.
The first stamp was a freebie (very generous) and this is where I found it Sliekje digi Stamps. Here is my card –

The second digital stamp set is from Michelle Perkett Studio and here is my card –

You might wonder about the sentiment on this card. Well here is the poem which it refers to –
RAINBOW BRIDGE
Just this side of heaven is a place called Rainbow Bridge. When a pet dies – one that’s been especially close to someone here, that pet goes to Rainbow Bridge. There are meadows and hills for all of our special friends so they can run and play together. There is plenty of food, water and sunshine, and our friends are warm and comfortable, fear and worry free.
All the animals who had been ill and old are restored to health and the vigor of youth. Those who were abused, hurt or maimed are made whole and strong again just as we want to remember them in our dreams of days and times gone by.
The animals are happy and content, except for one small thing; they each miss someone very special to them – someone who had to be left behind. That someone who was kind, gentle and loving. That someone who took the extra step, stayed the extra minute, reached out and touched with love, even once.
The animals all run and play together, but the day comes when one suddenly stops and looks into the distance. His bright eyes are intent, his eager body quivers. Suddenly he begins to run from the group, flying over the green grass, his legs carrying him faster and faster.
You have been spotted, and when you and your special friend finally meet, you cling together in joyous reunion, never to be parted again. The happy kisses rain upon your face, your hands again caress the beloved head, and you look into the big, trusting eyes of your special love, so long gone from your life but never absent from your heart.
Then you cross Rainbow Bridge together. . . . . . . . . . . . .
Author Unknown


I hope one of these cards might lift her spirits a little. We are thinking of you.
Bye for now,

Just a very quick post to let you know about another recipe from Justine Schofield “Everyday Gourmet”. We had this meal last night – d e l i c i o u s!!!
Click here to go to the site for the recipe.

This photo is from the website. My pies were made in “ramekins”. Do you remember ramekins from the 70’s. They were so popular to give for wedding presents.
Bye for now,
The current challenge at The Teddy Bo Blog is “Red, White & Blue — and bling”. I wanted to enter this challenge but I wanted to do something a bit different from the “Royal” theme. I thought that this Teddy Bea was cute and wanted to use her. “idea ” She has an envelope in her hand and airmail envelopes had red, white and blue stripes around the border. So here is my card –

I stamped the card base with a Hero Arts cling stamp “old letter”. Next I cut the border off an old airmail enveloped which I have stored away since I was a teenager and used to have “pen pals”. (:lol: I knew it would come in handy one day). I found these great little vintage digital envelopes on Etsy at “Vintage by me”. The red, white & blue twine was in my stash.

Teddy Bea is constructed – yes constructed or is it deconstructed? – using this tutorial by Mandi-Lee on Copic Oz.

Hope you enjoyed your weekend.
Bye for now,
This is one of those “no reason” cards. I’m not entering it in a challenge, don’t need it for a birthday or other occasion, just wanted to have a play and see what I could come up with. I had decided, or thought I had, on a completely different card with darker tones and quite different embellishments. In the end I am very happy. Perhaps I need to play and experiment more often to give myself more freedom to try different things.

Can you see the discreet sparkly flourishes on the white card? I have a glue pad (the same as an ink pad but with glue of course) and it has had a lonely life pushed right to the back in one of the draws. It finally saw the light of day today. I used a flourish stamp (another neglected crafty item) with the glue pad and then stamped it around the image. Then I sprinkled glitter lightly onto the glue. I like the understated effect.

I stamped the same flourish in smokey grey, with a little addition of some distress inks, onto the very light pink card then ran it through a swirly embossing folder. I cut around the flourishes to create a frame (well half a frame). I added some distress crackle paint to the frame (first time I’ve attempted this – next time I will use a thicker layer of paint).

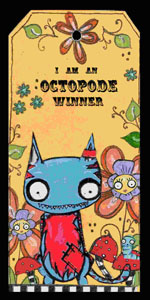
I think this image is great. It is called “Breakfast at Tiffany’s” by the Octopode Factory. The sentiment is from a set by Stempelglede “Just a Note”. The filigree style corner is a die cut from Lal-lal land crafts. Lots of sparkle and glitz on the card and on me, desk and floor as well. I think that I should try another card in the darker tones and style which I first envisaged. That might be possible over the weekend.
Okay that’s all for now,
Welcome back. I have made some time to quickly let you know about a meal I cooked yesterday. We loved it. I saw it on TV on the “Everyday Gourmet” with Justine Schofield. She had a quest on from Weight Watchers and this was her recipe.
Creamy chicken and pumpkin pasta
Ingredients
- 300 g pumpkin, peeled, cut into 3 cm pieces
- 250 g cherry tomatoes, halved
- 160 g pasta
- 2 tsp olive oil
- 250 g lean chicken breast, fat trimmed, sliced
- 1 medium red onion (I just used a brown onion)
- 1 clove fresh garlic, crushed
- 1 Tbsp cornflour
- 375 ml evaporated skim milk
- 6 green olives, drained, pitted, sliced (I didn’t have these)
- 1/4 cup granted parmesan cheese
- 1 x 3 second spray oil spray.
Instructions
- Preheat over to 220° C or 200° C fan-forced. Line a baking tray with baking paper. Place pumpkin on prepared tray and lightly spray with oil. Bake for 20 mins. Add tomatoes and bake for 10 mins. or until pumpkin is lightly browned and tomatoes soften.
- Meanwhile, cook the pasta in a medium saucepan of boiling salted water, following packet instruction or until just tender. Drain
- Heat oil in a non-stick frying pan over medium-high heat. Add chicken and cook, stirring, for 5 mins. or until lightly browned. Transfer to a plate. Add onion and garlic to the pan and cook, stirring, for 5 mins. or until softened. Return chicken to pan.
- Blend cornflour and a little evaporated milk in a jug. Stir in remaining milk. Add milk mixture to pan and bring to the boil. Reduce heat to low and simmer, stirring occasionally, for 3 mins. or until sauce thickens slightly (I stirred it for about 5 mins.)
- Add the pasta, olives and roasted pumpkin and tomatoes to the sauce. Stir gently to combine.
- Serve pasta sprinkled with parmesan cheese.
It should serve 4.
It was delicious but the best bit was that it used up some of our pumpkins. We almost have pumpkins coming out of our ears 😯 – that sounds painful doesn’t it 😆
Why not try it ‘cos it is quick and easy and you’ll love it.
Bye for now,
The card I have today is for the Challenge “Stitching” at Splendid Stamping with The Greeting Farm. You can use any type of stitching (machine, hand, faux…). My type of stitching is “bad” (just as well they don’t judge the sewing). The loops from the back have come through to the front. I think I might have threaded the machine incorrectly. 😐 Actually I quite like the effect even though not what I was aiming for. The stitching is used to “ground” Anya – I know it’s her birthday but she still should be grounded.

I also added 2 rows of pierced holes on the sentiment block. You might be able to see it more clearly here –

The stamp is from The Greeting Farm “Miss Anya Bags” one of the 3 lovely girls in this set. I have coloured her with Copics and paper pieced her bag with paper from a Teresa Collins Paper Pad “Spring Fling”. The sentiment is from PTI as are the stamped butterflies. The flowers are from Wild Orchid Crafts.
This might be the last card for a couple of days as I have appointments now until Thursday. You never know though I might get a bit antsy and just have to make something late at night. 😆
Bye for now,

I’ve made a batch of cupcakes – well “cupcake” ATC’s. A cupcake theme for ATC’s sounds easy doesn’t it and you wouldn’t think that someone could singe this type of cake. Well I managed to! 😦 It was early yesterday morning and the light was very poor when I decided to heat the “liquid applique” so it would puff up. There was no problem with it puffing up but on a few of them I heated for a tad too long and they were singed. I laughed to myself because that often happens with my real cooking as well. If you take a close look at the photo you probably see what I mean.

The “Heart Cupcake” digi stamp is from Limited Runs Digital Stamps. They have a wonderful array of cupcakes and I didn’t know which one to buy so, of course, I bought a few 😆
I am actually early with my cards this month so everyone should be happy.
Bye for now,

Can you guess the Christmas Song which I have based this “tee pee” card on? NO! Well I should tell you – “I saw mummy kissing Santa Claus” underneath the mistletoe last night. Yes the Magnolia Stamp is “Mistletoe Tilda”. I’ve made this card for the Christmas Cards All Year ‘Round May Challenge which is to create a card inspired by your favourite Christmas carol or song
I coloured the stamped image with Copics. Usually when I cut out stamped images I cut right on the black line but this time I left a fine white border (which I notice is quite popular with some stampers). I left a border to make it easier to cut around the fine details of the mistletoe.
Here are photos of the sides of the card –


I have used the “mistletoe” die from C.C. Designs to decorate the sides of the card. The embossing folder I used for the background is from Sizzix “Stars & Swirls” (I love that folder – I think it even works for baby cards).
Last year I provided short instructions on how to make a “tee pee” card. Click here to go to the instructions. I’ve used this style of card because it reminds me of a Christmas tree. Here it is unfolded –

The sentiment is a Whimsy stamp.
For some good news for me (hope it doesn’t sound like I’m bragging) I won the Octopode Factory Challenge “Animals”. I was sooo happy ‘cos I hadn’t won a challenge this year. Look here!
Bye for now,
Don’t read any further if you don’t want to gain weight and start on the road to tooth decay. lol
A month ago I went to a 60th party and there were some fun slices there. I put the thought of them at the back of the brain for future reference. In the meantime we had promised to watch an 11-year-old boy play football when his team vs my dh’s team. Well that happened to be last Sunday and his mum invited us to morning tea at their home after the game. They have 4 young children in their family and I was trying to come up with something I could make to take along. 💡 Perfect for children – well perhaps not healthy but a fun treat. Easily found lots of recipes on the web.
Licorice Allsorts Slice and Lolly Banana Slice –

Banana Slice (from Best Recipes.com.au)
- 1 x 250g packet of sweet biscuits (I used Marie biscuits) – crushed
- 1/2 x 395g tin condensed milk
- 115g margarine or butter, melted
- 1 packet of lolly bananas, musk sticks, maltesers (or anything else that takes your fancy) chopped roughly
- coconut (optional)
- Brush or spray pan and line with non stick baking paper.
- Mix all ingredients together then press into a 20 cm x 25 cm slice tin
- Sprinkle with coconut if desired (I covered with white chocolate – see measurements in the next recipe)
- Refrigerate, then cut into SMALL squares.
Note. This can also be rolled into a log shape and rolled in coconut, then sliced after being refrigerated.
Licorice Allsort Slice (from Taste.com.au)
- Melted butter, to grease (or spray oil)
- 125g butter, chopped
- 160ml (2/3 cup) sweetened condensed milk
- 1 tablespn golden syrup
- 1 x 250g pkt plain sweet biscuits (I used Marie again) crushed
- 45g (1/2 cup) desiccated coconut
- 1 x 375g pkt licorice allsorts, coarsely chopped
- 200g dark cooking chocolate, chopped
- 30g copha
Brush a 19 x 29cm lamington pan with melted butter to lightly grease. Line the base and sides with non stick baking paper, allowing it to overhang slightly.
Combine the butter, condensed milk and golden syrup in a medium saucepan over low heat. Cook, stirring to 5 minutes or until butter melts and mixture is smooth. Transfer to a large heatproof bowl. Add the biscuits, coconut and licorice allsorts and stir until just combined. Press the mixture into the base of the prepared pan and set aside for 30 mins to set.
Place the chocolate and copha in a heatproof bowl over a saucepan half-filled with simmering water (make sure the bowl doesn’t touch the water). Use a metal spoon to stir over low heat until chocolate melts and mixture is smooth. Pour the chocolate mixture over the slice in the pan. Place in the fridge for 1 hour to set. Cut into SMALL squares to serve.
Two last thoughts. I would suggest you chop the lollies fairly small – I left them too big. If you have time to leave it overnight it is much better.
Well there are the recipes, it’s up to you if you are game enough to try them. REMEMBER – use only as a treat 😆
Bye for now,
Really …. you do make me smile. I have had some really lovely comments lately and that makes me grin from ear to ear – love comments. Thank you.
Something else that makes me smile is this “off the page” project for The Octopoade Factory Friday Challenge (TOFF #48 – Animals).

The digi stamp is called “Carebear”. Cute in his own special way 😆 I printed him twice. Once on Kraft card and then again on cheap scrap card. I cut the craft card to fit the front of the little note-book and then carefully cut out the second image to use as a negative and positive mask. I masked the bear and stamped background swirls over the mask with Distress Ink. Than I masked the background and stamped a burlap background stamp onto the bear again with Distress Ink. I used Prisma pencils and Gamsol to colour the bear and background. The last step was to stamp the sentiment from “Verve Stamps” with a darker Distress Ink.

I have a few of these little Kraft note books and I am so thrilled with the result this time that I’m sure I will have a lot of fun with the others.

I have added red Bazzill card under the ATC size stamp Kraft card, on the spine and back. I die cut the edge on the front only. The final touch is some fine gold card.

This is my first attempt at this style of stamping and I love it. It is good to get out of your comfort zone sometimes but only sometimes. 😯
Bye for now,

This afternoon one of my dgs’s came to visit. I was in my craft room when he arrived (I know you won’t be surprised to hear that) 😆 He saw the card I am about to show you and wanted to play with it, which I let him do under my strict guidance. He giggled and was not too keen to give it back. I took that as a very good sign that all little boys would like this card.
Today’s card is for Mo’s Digital Pencil Challenge #135 – Circle Card. I love circle cards so straight away knew that I wanted to enter the challenge. I looked through my Mo’s digi stamps to find one which would fit into a circle very well. Georgie Cartwheel was perfect I thought. Here is my circular easel card –

Georgie can actually do a cartwheel. What a clever little fellow.


So that Georgie could swivel I printed 2 images and cut them out. Coloured one just around the edges and the copy which was to be the top was coloured fully with Copics.
I cut out the die shapes in card and patterned paper. Adhered the patterned paper to the teal card and placed the half coloured Georgie on the centre of these. Then I punched a hole through the centre of them and set on eyelet. Next I attached the fully coloured Georgie with ds foam dots to the top. (I actually had to loosen the eyelet a little so it would swivel well). Voila – Georgie could cartwheel.
Kids love to sumersault and cartwheel outside on the grass so I wanted some grass under him. I diecut some grass and folded it up. This not only satisfied my requirement of grass but also kept the front focal piece of the card in place. You might see more clearly in this photo.

The grass folds down when posting the card.

The sentiment is from Hero Arts and usually goes with shoe stamps, but I thought it suited this card – he is definitely kicking up his heels.
Bye for now,

While I was babysitting yesterday a friend dropped in to go for a walk so off we went with dgs in the pusher. She was telling me about the “Grace Kelly Exhibition” which is now showing in Bendigo. Apparently it is beautiful and well worth going to see. Has anyone else seen it?


Good OLD Gus. I use “Gus” digi stamps from Bugaboo very often for male birthday cards. This card is for my dbil who will be —— no don’t worry I won’t giveaway his age. I hope he enjoyed his birthday and likes the card.

I didn’t construct this card in the usual way. Instead of cutting card and folding it in half to make the base, I cut 2 card bases and joined them at the top with strong ds tape then decorated the front panel. Then I added an eyelet at the top for added strength near the fold. This photo might show the fold more clearly.

From the back.

I have paper pieced Gus’s overalls, party hat and the balloon. Apart from the paper piecing it is a very straightforward card with some Prima Alphabet/number stickers and a few Kaisercraft Rhinestones. The paper is from My Mind’s Eye “Away We Go”.
Bye for now,
I’m only talking about a card challenge, not the weather, thank goodness.
The challenge at Winter Wonderland this week is “Frosty the Snowman“. Because it isn’t cold here at Christmas I only have a couple of snowman stamps. I have this one which comes in a Transparent set from Penny Black. Here is the card –

I have used “many many” (that always reminds me of Commandant Lassard in Police Academy) dies, embossing folders and punches for this card. The snowman is the only part which I hand cut. No patterned paper (gasp). Lots of sparkle. Here is a close-up of the snowman. He is glittery as well.

Thanks for dropping by to take a peek at my card. I have another ready to show you tomorrow,.
Bye for now,